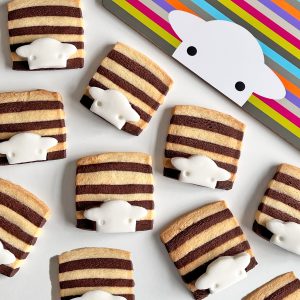
Decorate your Christmas table with Herdy’s delicious chocolate cookies—complete with a space to write each guest’s name. They make charming (and edible!) place settings, and Herdy’s even wearing a festive jumper for the big day. Just try not to eat them before the turkey arrives!
Ingredients
For the Cookies
200g unsalted butter, softened
110g caster sugar
1 tsp vanilla extract
280g plain flour
50g cocoa powder
4 tbsp milk
For the Decoration
300g ready-to-roll royal icing
Icing sugar (for dusting)
Edible ink pens
Method
1 - Cream the butter and sugar. In a large mixing bowl, cream together the softened butter and caster sugar with a wooden spoon until light and smooth.
2 - Add the dry ingredients. Sieve in the flour and cocoa powder, then add the vanilla extract. Begin mixing, adding the milk as needed to bring the dough together. Use your hands to finish combining and knead lightly until smooth.
3 - Chill the dough. Wrap the dough in cling film and refrigerate for 30 minutes. Chilling helps the cookies keep their shape during baking.
4 - Preheat the oven. Set your oven to 180°C (350°F) or Gas Mark 4.
5 - Roll and cut the cookies. On a well-floured surface, roll the dough to about 6mm thick. Using the larger Herdy cookie cutter, cut out as many shapes as possible (we made 12). Place them on a non-stick or parchment-lined baking tray, leaving space between each one.
6 - Bake. Bake for 10–12 minutes. Remove from the oven and allow to cool completely on a wire rack.
7 - Prepare the icing decorations. While the cookies cool, roll out the royal icing to around 2mm thick, dusting your surface generously with icing sugar to prevent sticking.
8 - Create Herdy’s festive jumper. Using a ruler, draw straight horizontal lines across the icing with your edible pens, then add simple patterns—polka dots, stars, stripes—between the lines to create a cosy Christmas jumper design.
9 - Cut the icing shapes. Using the Herdy cookie cutter as a guide, carefully cut out the tummy section with a sharp knife. Take your time to get smooth edges.
10 - Attach the icing tummies. Mix 2 heaped teaspoons of icing sugar with a splash of water to form a thick paste—this will act as your glue. Brush a thin layer onto the back of each icing piece, then gently press it onto the cooled cookies. Roll out small rectangles of icing and place them on Herdy’s tummy: this will be the name-label area.
11 - Let them set. Allow the decorated cookies to sit for about 30 minutes, or until the icing has fully dried and set.
12 - Write the names & enjoy! Use edible ink pens to write your guests’ names, then place the cookies around your Christmas table.
Top Tip:
Use leftover icing scraps to make extra winter accessories—tiny hats, scarves, or boots—for your Herdy Christmas cookies!
Sign up for our newsletter and you'll automatically be entered into our monthly prize draw, ewe could win £100 worth of Herdy goodies!
Enter your email address
You can change your mind at any time by clicking the unsubscribe link in the footer of any email you receive from us, or by contacting us at hello@herdy.co.uk. We will treat your information with respect. By clicking to Join Us, you agree that we may process your information in accordance with our terms.